
As i was playing around with Spark on my macbook for a school project, i decided i didn’t want to use the version our professor gave us, which was a Java project, and had to be coded in Scala, language i’m not really familiar with.
I love python, really, and as i knew Spark supported python i decided to give a look at what options i had to install and run it for testing and analysis of small datasets on my macbook.
So… For my reference when i’ll inevitably reinstall it and will forget the steps, and for you, who are presumably looking to install spark and use it within python, here’s how i did it!
Requirements
In order to follow the guide step by step you’ll need:
- Python 3.5 installed (2.7 should also work, choose the one you prefer to code with) (Python 3.6 is incompatible with the current Spark version).
- Py4J
- Jupyter Notebook and IPython installed
On my macbook I installed all the requirements via Anaconda:
- Download Anaconda from: https://www.continuum.io/downloads#macos and install it.
- Open Anaconda-Navigator and create a new virtual environment with python 3.5 (Environments->Create New->Python Version:3.5)
- Install Jupyter Notebook and qtConsole
- Open a terminal and activate the virtual environment you just created, let’s say you named it ‘python35’ type:
-
1$ source activate python35
-
- Install Py4J via pip
-
1$ pip install py4j
-

Perfect, the requirements are in place, it’s time to pass on to Spark!
Spark & Python
Spark supports python via the “pyspark” module, this allows to write applications in python which will interface with spark.
Applications can either be run as standalone apps, importing the pyspark in the python app, or you can run an interactive python (or IPython / Jupyter) shell in a Spark context.
Install
We wanted to install spark didn’t we? Let’s do it then!
- Download spark with hadoop from: http://spark.apache.org/downloads.html (At time of writing the latest version is spark-2.1.0-bin-hadoop2.7)
- Unpack it in the ~/Applications directory
Done!
It was easy, wasn’t it?
Open a terminal and source it to the python35 environment and you’re ready to go, you can start by launching the “pyspark” executable in the bin folder.
|
1 |
$ ./bin/pyspark |
This will open an interactive shell in python which you can use to start playing around.
But that’s not really handy if you have a big project or want to present some data as a notebook, isn’t it? In fact my real objective was to be able to launch self contained apps, as well as work insite jupyter notebook, which is really good to play around with ideas before formalizing them in an app.
So, how does it work?
Self contained App
To be able to use Spark in a self contained app we have to first import the Spark Context into it:
|
1 2 3 4 5 6 7 8 9 10 11 12 13 |
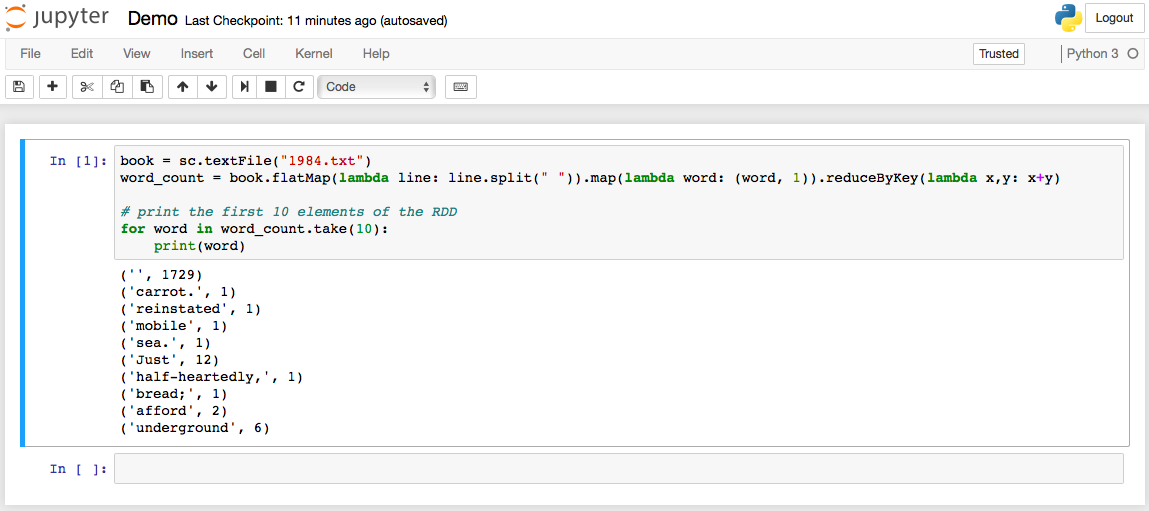
from pyspark import SparkContext # "local" specifies that spark be run on your computer, as opposed to a remote cluster. # "MySparkApp" is just the name of the app in the spark console sc = SparkContext("local", "MySparkApp") # Your spark code: # eg. book = sc.textFile("1984.txt") word_count = book.flatMap(lambda line: line.split(" ")).map(lambda word: (word, 1)).reduceByKey(lambda x,y: x+y) # print the first 10 elements of the RDD for word in word_count.take(10): print(word) |
Then to run it (always from our environment):
|
1 2 3 |
$ YOUR_SPARK_HOME/bin/spark-submit --master local[4] MySparkApp.py (Where local[4] is telling Spark to run on localhost with 4 threads) |
IPYTHON / Jupyter
To run in IPython/Jupyter we’ll need to add some variables to the shell environment:
|
1 2 3 |
$ vim ~/.bash_profile (Or your favorite editor) |
|
1 2 3 4 5 6 7 8 9 |
# Append this # SPARK export SPARK_HOME=~/Applications/spark-2.1.0-bin-hadoop2.7 alias py_spark="$SPARK_HOME/bin/pyspark" export PYTHONPATH=$SPARK_HOME/python/:$PYTHONPATH export PACKAGES="com.databricks:spark-csv_2.11:1.4.0" export PYSPARK_SUBMIT_ARGS="--packages ${PACKAGES} pyspark-shell" export PYSPARK_DRIVER_PYTHON=ipython export PYSPARK_DRIVER_PYTHON_OPTS="notebook --no-browser --port=7777" |
Done!
Restart the shell, source the environment and type:
|
1 |
$ py_spark |
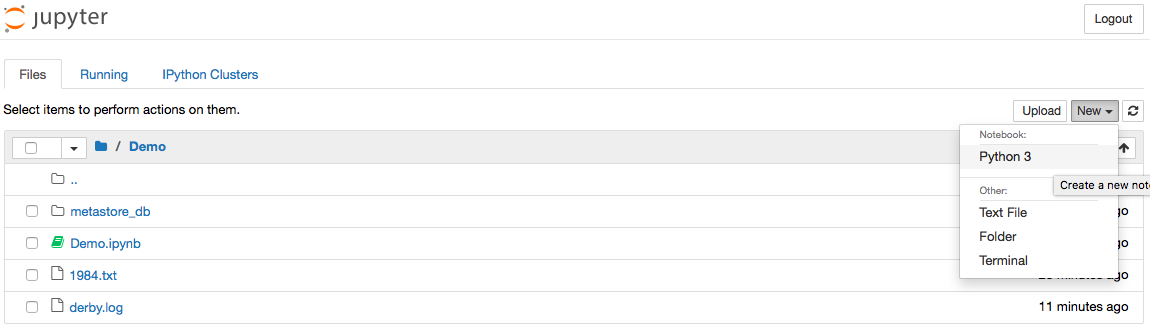
You’ll be greeted with IPython starting the notebook and prompting to open the browser, just open the link and create a new notebook. (Beware Jupyter gets access only to the folder & subfolders you started it in, start it where your project resides)
|
1 2 3 4 5 6 7 8 9 10 11 12 |
(python35) mypc:spark-2.1.0-bin-hadoop2.7 francesco$ ./bin/pyspark [TerminalIPythonApp] WARNING | Subcommand `ipython notebook` is deprecated and will be removed in future versions. [TerminalIPythonApp] WARNING | You likely want to use `jupyter notebook` in the future [I 19:48:31.622 NotebookApp] Serving notebooks from local directory: /Users/francesco/Applications/spark-2.1.0-bin-hadoop2.7 [I 19:48:31.622 NotebookApp] 0 active kernels [I 19:48:31.622 NotebookApp] The Jupyter Notebook is running at: http://localhost:7777/?token=670540452905476h49dj06sk75402h743026s709485j2 [I 19:48:31.622 NotebookApp] Use Control-C to stop this server and shut down all kernels (twice to skip confirmation). [C 19:48:31.624 NotebookApp] Copy/paste this URL into your browser when you connect for the first time, to login with a token: http://localhost:7777/?token= 670540452905476h49dj06sk75402h743026s709485j2 |
That’s all, enjoy 🙂
P.S.
For your fun: 1984.txt